Hello everyone,
Today I'm going to show you how to customise your nav menu, nav menu mostly comes after the blog header, I'll show you two ways;
1. Adjusting the original Nav-menu
If you will like to move your nav menu to centre or left follow the steps below;
1. Go to TEMPLATE -- CUSTOMIZE -- ADVANCED -- ADD CSS
2. Simply paste the below code in the CSS section and click apply to blog
.PageList {text-align:center !important; }
.PageList li {display:inline !important; float:none !important; }
Now if you would like to align your nav menu left or right, simply change the highlighted text to "left" or "right".. Your blog should look like this now...
2. Customizing your own nav-menu:
This is going to be a little bit stressful, but it's worth it, originally I used image-maps but they changed their setting couldn't find my way around it... so I tried something else... let's begin
1. First thing is to create the menu i.e the pages one after the other, to do this you will need to use picmonkey or any other similar app. So in the last post I showed you how to use picmonkey, now design your nav-menu any how you love it...
simple tip... upload any image you like, edit your text, add overlays if you like but try to keep the width and height same, I used 138X44.. You will do this for each menu e.g. HOME, CONTACT e.t.c.
simple tip... upload any image you like, edit your text, add overlays if you like but try to keep the width and height same, I used 138X44.. You will do this for each menu e.g. HOME, CONTACT e.t.c.
2. Now upload your images to photobucket. Click on the image you uploaded, on the right you will find links to share this photo now copy the direct link this will be your IMAGEURL
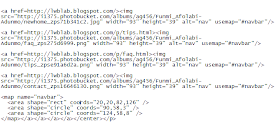
3. Go to layout, click add a gadget, select HTML/JavaScript, paste the codes below into it.
<a href=PAGE URL><img src="IMAGEURL" width="93" height="39" alt="nav" usemap="#navbar"/>
<map name="navbar">
<area shape="rect" coords="20,20,82,126" />
<area shape="circle" coords="90,58,3" />
<area shape="circle" coords="124,58,8" />
</map></a></a></center></p>
4. Now change PAGEURL to the page you want to direct to, IMAGEURL to the direct link you copied from photobucket, change the width and height as it pleases you.
Copy the highlighted codes and do same for the rest. Arrange them how you want it to appear on the blog.
5. When you are done, move the gadget under the blog header, preview and save! there you have it!
Your blog should look like this..
If you would like to move it to the center simply add this code <p><center> at the beginning of the code right before <a href.
Your code should look like this
Ok guys that's it! Easy right?? Let me know if you have any questions! Have a fabulous day!
Thanks for stopping by!
xoxo
Olufunmi
Facebook | Twitter | Instagram | GFC


Great info.
ReplyDeleteOMG thanks, Ive been trying to figure out how to do this.
ReplyDeletei'm glad it helped
DeleteIt looks longish *sad face* and I need to do it *crying*. Thanks. You are d bestest boo in the world
ReplyDeletewww.mylifeasmoby.com
lool.. it won't take up to 5 mins :p
Delete